tutorial, we'll do the original metal sign. The lesson is more suitable for beginners. You will learn how to add text to create a variety of styles and highlight using simple techniques.
Step 2: Select the font
For labels, we will use a free font Lobster 130pt size and color # 214555;

Step 3: Add a layer style
Now let's add some style to our text layer, for this, go to Layers -> Layer Style ( Layer-> Layer Styles ) and set the following parameters:
The outer-shadow (Drop Shadow) :
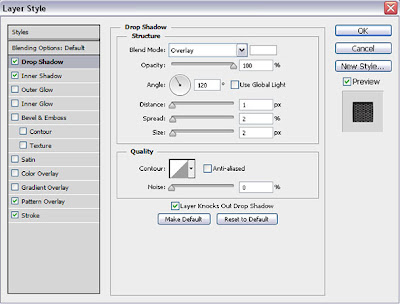
-Inner Shadow (Inner Shadow) :
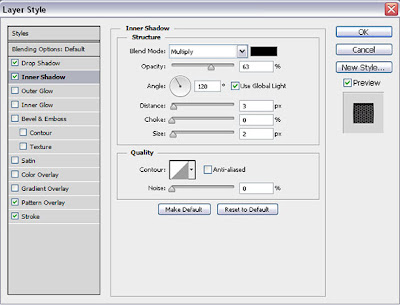
Note: the larger the size of the text, the higher the value is set for the parameters of the outer and inner shadow.
- Pattern Overlay . Save this picture:

Open it in Photoshop / select Edit-> Define Pattern (Edit-> Define Pattern) and name it somehow . (Or you can download the pattern here and install it in Photoshop). Double click the layer to open the Styles.
Now add this text fill, using the following settings:
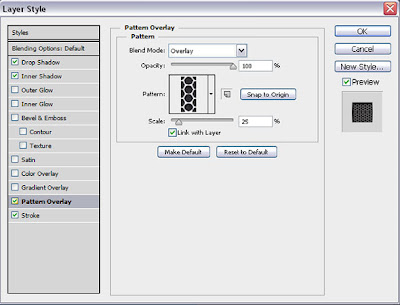
-Contour ( Stroke ):
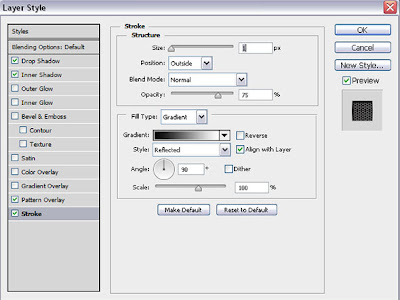
If you set all the parameters styles correctly, you must have the following result:

If your text is different from what you see here, check all settings.
Step 4: Create a background
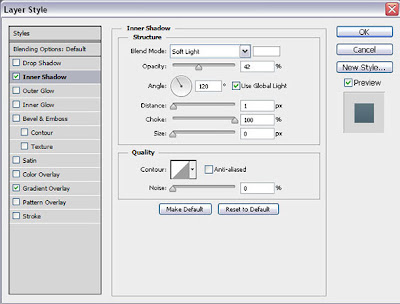
We add our background a few settings to give it depth. Go to Layers - Layer Style (Layer-Layer Styles), or simply double click on the layer and add the following parameters:
-Inner Shadow (Inner Shadow) :
-Blend (Gradient Overlay) :
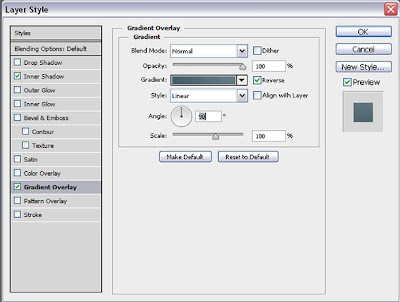
For the gradient, use the following colors:
1. # 667c85 (light blue)
2. # 475e68 (dark blue)
The result:

Step 5: Add highlight text
Press the «Ctrl» and click on the text layer thumbnail in the Layers palette to create a selection of text.
Create a new layer above the rest. Using the tool gradient (gradient) from white to transparent, drag it down.
Select the oval selection (Elliptical Marquee Tool) and create the same oval as shown below:
Go to Select - Inverse ( Select -> Inverse ), to invert your selection and click "delete", to remove unnecessary parts of the gradient. This should leave you highlight only the upper part of the text.
To make the highlight more natural, change the blending mode of this layer to Overlay (Overlay).
We should get this result:

The lesson was created based on loreleiwebdesign
The final result:

Step 1: Preparation of the document in Photoshop
Create a new document in Photoshop (Ctrl + N). The size of our document 600 * 400 px, but you can make it longer if you need it.

Step 1: Preparation of the document in Photoshop
Create a new document in Photoshop (Ctrl + N). The size of our document 600 * 400 px, but you can make it longer if you need it.
Step 2: Select the font
For labels, we will use a free font Lobster 130pt size and color # 214555;

Step 3: Add a layer style
Now let's add some style to our text layer, for this, go to Layers -> Layer Style ( Layer-> Layer Styles ) and set the following parameters:
The outer-shadow (Drop Shadow) :

-Inner Shadow (Inner Shadow) :

Note: the larger the size of the text, the higher the value is set for the parameters of the outer and inner shadow.
- Pattern Overlay . Save this picture:

Open it in Photoshop / select Edit-> Define Pattern (Edit-> Define Pattern) and name it somehow . (Or you can download the pattern here and install it in Photoshop). Double click the layer to open the Styles.
Now add this text fill, using the following settings:

-Contour ( Stroke ):

If you set all the parameters styles correctly, you must have the following result:

If your text is different from what you see here, check all settings.
Step 4: Create a background
We add our background a few settings to give it depth. Go to Layers - Layer Style (Layer-Layer Styles), or simply double click on the layer and add the following parameters:
-Inner Shadow (Inner Shadow) :

-Blend (Gradient Overlay) :

For the gradient, use the following colors:
1. # 667c85 (light blue)
2. # 475e68 (dark blue)
The result:

Step 5: Add highlight text
Press the «Ctrl» and click on the text layer thumbnail in the Layers palette to create a selection of text.
Create a new layer above the rest. Using the tool gradient (gradient) from white to transparent, drag it down.
Select the oval selection (Elliptical Marquee Tool) and create the same oval as shown below:
Go to Select - Inverse ( Select -> Inverse ), to invert your selection and click "delete", to remove unnecessary parts of the gradient. This should leave you highlight only the upper part of the text.
To make the highlight more natural, change the blending mode of this layer to Overlay (Overlay).
We should get this result:

The lesson was created based on loreleiwebdesign
No comments:
Post a Comment